Configure NTP client and time settings of Router
In this tutorial, we are going to learn about time settings of Mikrotik router. There are two ways you can setup your time settings. One is manually setup from clock settings of router which is local and another way is configuring NTP client to synchronize clock with remote timeserver.
NTP stands for Network Time Protocol which is designed for clock synchronization of routers, computers over network.
Clock Settings setup:
At first, we will see local clock setting configuration on Mikrotik.
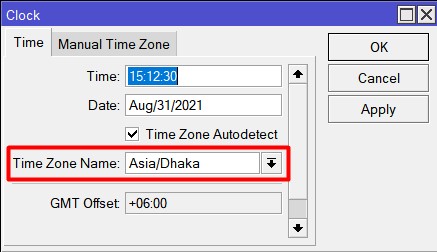
- From the left panel menu select ‘system’ and click on ‘clock’. If it’s a new router, you will see startup date is jan/02/1970.
- From this clock window set date as your current date.

Format is month/day/year. Month name will be first three letter of any month. Like December you write Dec.
- Select timezone from ‘Time Zone Name’ drop down list. Select your zone name. I select Asia/Dacca as my timezone.
From RouterOS version 6.27, there is a new feature calls time zone autodetect. time zone autodetect is enabled by default and time zone is set automatically. The time zone is detected when your router is coming to production network.
There is another tab here- Manual time zone. You will set it only if your country uses Day Light Saving time. But to configure it, select manual as time zone name.
NTP client setup:
By default router has this package named SNTP client, so you don’t need to install NTP package for it. But if you want to make this router as NTP server, you need NTP package for your router.
After you configure NTP client, your router time will synchronize with remote timeserver. You need to set accurate time by this configuration because later you will analyze router log by seeing timestamps for any incident happens. This is very important for system admin.
Configuration steps:
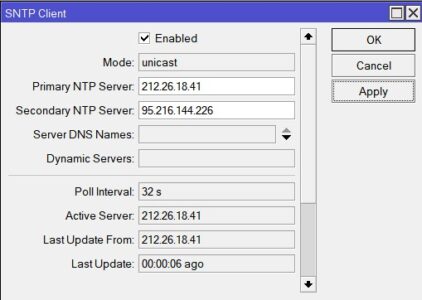
- Go to system and then SNTP client.
- Check enable and put primary NTP server and secondary NTP server IP address.

Collecting NTP address if your don’t have your own:
If you don’t have your own NTP server, then you may collect NTP server IP from pool.ntp.org.
- Go to your browser and copy this URL https://www.pool.ntp.org/zone/bd [You may put your zone name instead of ‘bd’].
- Click on ‘use the pool’. Now copy the first address to your primary NTP server and second address to your secondary NTP server.
- Click apply and your NTP URL address will convert to IP address. So you don’t need to worry about their IP address.

Video Tutorial: