OpenVPN Configuration in Mikrotik Router for Remote User
This guide will help you to configure OpenVPN in Mikrotik Router and help a remote user to login to head office VPN server and work from remote location. OpenVPN is just like other type of VPN service like PPTP, L2TP, SSTP.
OpnVPN can be used for site to site VPN and also can be configured as VPN Server-Client model where remote user can access to head office network by connecting to VPN server. OpenVPN has complete security features so it is safer than other types of VPN.
In this tutorial, we will see OpenVPN server-client model where remote user connect to head office network by openVPN client software from Windows PC. For PPTP and L2TP there are built-in VPN client apps available on Windows but for OpenVPN we have to use third party application.
Part 1 – OpenVPN Server Configuration in MikroTik Router:
OpenVPN server and client configuration requires SSL certificate for secure communication. MikroTik RouterOS version 6 and above gives ability to create, store and manage certificates in certificate store. So, we will create OpenVPN certificate from our RouterOS. We need three types of certificates for OpenVPN server and client configuration:
- CA (Certification Authority) certificate
- Server certificate
- Client certificate
Create CA Certificate:
First we will create CA certificate. Go to system > Certificate
Click + sign to add
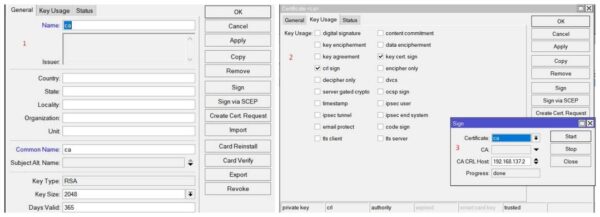
Put a name ca and common name ca. Click on Key Usage tab and uncheck all checkboxes except crl sign and key cert. sign.
Click on Apply button and then click on Sign button. Sign window will appear now. Your newly created certificate name will appear in certificate dropdown menu. Select your newly created certificate template if it is not selected. Now in CA CRL Host field we put our router WAN address 192.168.137.2. Click sign button and our sign certificate is created.
Create Server Certificate:
Now in this step, we will create our second certificate – Server certificate. Click + sign to add
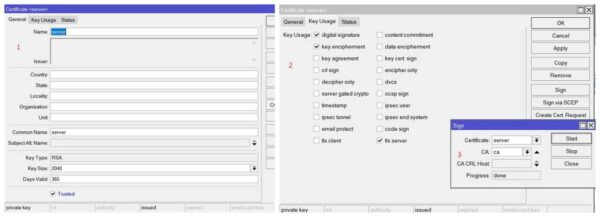
Put a name server and common name server. Click on Key Usage tab and keep digital signature, key encipherment and tls server ticked.
Click on Apply button and then click on Sign button. Certificate: server and CA is CA certificate. Click sign button and our sign certificate is created. If T flag or trusted property doesn’t show any value, double click on it and tick this box for trusted value.
Create Client Certificate:
Now in the final part, we will create client certificate. Click + sign to add
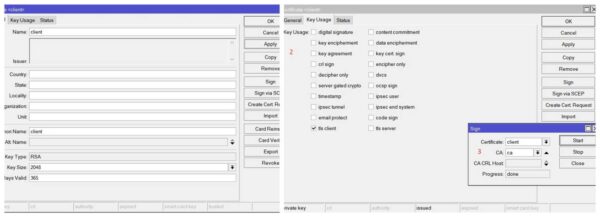
Put a name client and common name client. Click on Key Usage tab and keep only tls client ticked.
Click on Apply button and then click on Sign button. Certificate: client and CA is CA certificate. Click sign button and our sign certificate is created.
Export CA and Client Certificates
After creating certificates, we will now export CA and client certificate so that OpenVPN client can use this certificate.
OpenVPN server will use server certificate from MikroTik RouterOS certificate store. But client certificate has to supply to the OpenVPN client. So, we need to export client certificate and CA certificate from RouterOS certificate store.
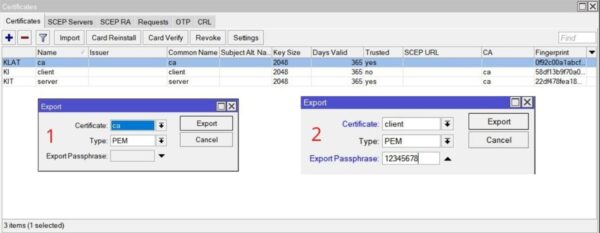
Double click on CA certificate. Click on export. This file now is now stored in mikrotik files section.
Now double click again. Click on export. From drop down, select client certificate. Now give a password. Password must be 8 character and this password has to provide when OpenVPN client needs to connect.
Click on export button and our client certificate and key file exported to mikrotik router file section.
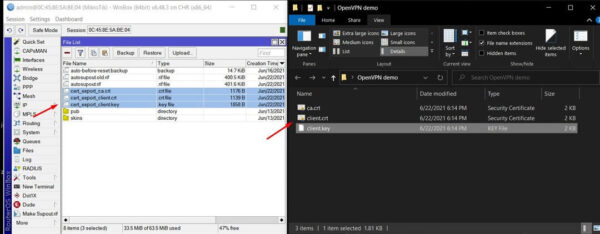
Now we check from the file section. There you can see, we have exported two certificate file and one key file.
Drag and drop these files to desktop. We will use these files when we configure OpenVPN client
OpenVPN server in Mikrotik Router:
After TLS certificate, we will now configure OpenVPN server in Mikrotik Router.
We go to PPP menu. On the interface tab, we click on OVPN server. Certificate-Server we will choose Server certificate and tick this box require client certificate. For Auth, we will use sha1. For cipher, we will choose aes256. Mikrotik router supports OpenVPN with TCP port 1194. Now tick this box to enable this service.

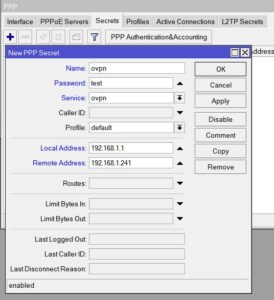
Now we have to create a user and password for remote user. To do this, we will go to secret tab.
Part 2 – OpenVPN Client Configuration in Windows Operating System:
Now to setup OpenVPN client, we need to download third party application as there is no OpenVPN client apps available on Windows operating system like L2TP or PPTP.
We go to the browser and type openvpn.net. Now from community download, we find our desired file. Download for windows 10 PC.
Now we will install it.
This application will help us to connect with OpenVPN server. Now we will enter the folder of OpenVPN application. Open the config folder. Now we will add certificate and key files in config folder.
We have to create a file with .ovpn extension. I copy and paste the templates to notepad file and save it as client.ovpn.
Download client.ovpn template: Click here to download
Now I will rename the file – ca, client, client.key.
We need one more file for the secret because we have put auth-user-pass file is secret. So our user and password authentication should be stored in a file called secret. We will make this secret file now. This username and password will be used to dial the VPN server.
ovpn
test
Save this as text file. Rename it and don’t give the extension.

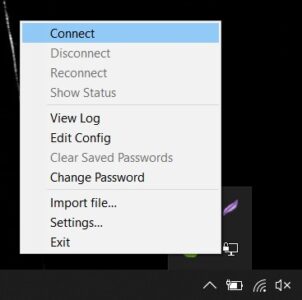
Now right click on your icon tray from taskbar. Right click on OpenVPN. Click connect and it will ask to put your client certificate password that you have given during client certificate export.
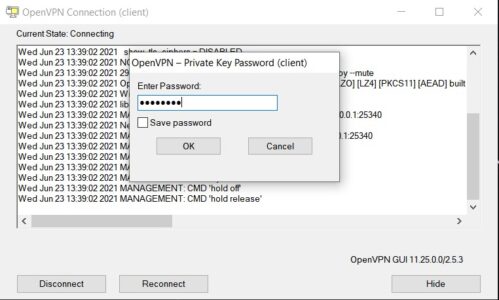
After verifying Client Certificate Password as well as username and password, OpenVPN Client will be connected.
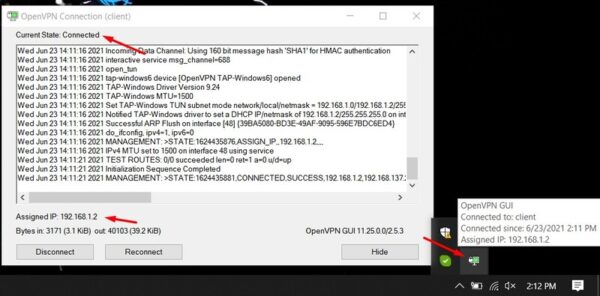
If you follow until this, you will be able to access your remote office resources with OpenVPN client.
Could You please share interface setup (WAN, LAN)
Interface setup is just like other setup we do to configure a router. I have WAN IP address which I got from my Internet provider and I choose ether1 port usually if I don’t have sfp port.
And for LAN setup, I have used the same IP for remote VPN user and internal LAN user. LAN IP: 192.168.1.1 and interface ether5.
Thanks
Can you please share Mangle and queue limit for openvpn on mikrotik please?
also how to route traffic betwen open vpn client and local network client with diferent ip thanks alot
Hi,
You can limit queue based on openvpn remote user IP in simple queue just like we do to our local user. Better you keep a block of IP for your remote user from your /24 block. Suppose you assigned 192.168.1.0/24 to your LAN and you may assign 192.168.1.240/28 to your remote VPN user for queue limit purpose. LAN interface IP still 192.168.1.1/24.
When remote user connects with VPN, he will access to local IP to your local office network and all the different reachable IP from local office.
Thanks
Please help me
I don’t have file ca.crt, i was export CA but in Files -> missing CA.crt
How can i fix it?
Hi,
In the Part-1, I shared the steps to create ca certificate. And later I shared the steps to export CA certificate. Then you must have ca.crt in MIkrotik files section.
You may also follow youtube video that I have shared with post.
Thanks.
Do I need to open TCP port 1194 on the Ruouter ISP?
I need to create a nat rule on the MikroTik dst nat to tcp port 1194 and nat to 192.168.90.1, where 90.1 is a MikroTik?
Yes. You have to open TCP port 1194. But you don’t need DST-NAT rule. Your remote user will connect your router via OpenVPN and can access to your LAN network.
Another thing that’s not working for me …
Can we talk by email? I wrote you!
Please please…
Greetings
Followed your instructions. Wasn’t clear on importing the certificates into the client so I just imported the ovpn config file. It connects without the certificate…why?
SOLVED! Further info…the classic OpenVPN client your article references is not available for download from openvpn.org. It has been replaced with OpenVPN Connect. As long as the .ovpn config file and certificates/keys are in the same directory, the certificates are automatically imported with the config file. HTH!
Why VPN assigned 192.168.1.2 and not 192.168.1.241 (remote ip in user configuration)?
What I have to do for assigning dynamic ip to the clients?
I have a problem.
My scenario is this
Router Hex S in DMZ: the router leave pass all traffic to my routerboard that have 172.16.100.9 as Wan address. Lan is 172.16.2.0/24 and local address of routerboard is 172.16.2.1 (gateway of LAN) . I have a dhcp pool on LAN 172.16.2.2-172.16.2.9
On Signing the CA I wrote 172.16.100.9 as CA CRL host (correct?)
On ovpn file I wrote 172.16.100.9 as remote address and leave all the others parameters unchanged
On Vpn User I wrote 172.16.2.99 as local address and 172.16.2.98 (even if I prefer separate)
When I connect the client all seems to work fine, but when attempting to establish the client hang on Management : state 1637585549
Any idea?
Thank you
Now it works. The error was so stupid…on ovpn file I had to write the public IP.
On local address I put 172.16.2.5 (free ip of my LAN) and on remote 172.16.100.9 (the internal interface of Microtik router that is on DMZ)
How can we create a pool of IP’s instead of one for each user.
Happy to block out 5 IPs for the Pool.
I have followed you directions carefully, and I CAN connect, however, all I can ping is the IP that I have my remote address once connected. It’s like I have the VPN running, but I am missing some kind of routing pieces.. I know with Mikrotik this is not automatic, but I am out of ideas.
Any suggestion of what could be missing?
hi i follow your guide and the vpn between my android phone and my mikrotik router works fine; from android i can reach my local lan; anyway, how can i route all the internet traffic through the openvpn tunnel? i need to reach some urls with the static public ip address of my home connection…; can you help me?
I am not able to set the Trust Flag on my Server and Client certs. After signing I get an error that the “certificate subject is read only”. Winbox64 3.35 doesn’t seem to work to allow me to edit these things. Most of my fields in the Certificates section are greyed out (like cert name). So, I’m forced to use the WebFig and there is no Trusted checkbox. hEX on 6.42.11. Where do I go from here?
Where can i down the client config file that mentioned on the video(https://www.youtube.com/watch?v=WzApPczmA_c&t=2s) and thanks!