How to add Mikrotik Router in GNS3
In this lesson, we will learn how to add Mikrotik Router in GNS3 and work in VMware workstation environment.
Required software for the task:
For the task we need to download few software.
- GNS3 2.1.15
- GNS3 VM
- VMWare Workstation 15.5 Pro
- Mikrotik Cloud Hosted Router Raw image
Download Required Software:
We will install GNS3 2.1.15 GUI application on Windows 10 and GNS3 VM on VMWare workstation 15 Pro. This is the recommended way to run GNS3 VM. We will then integrate GNS3 VM with GNS3 GUI.
At first, we will download GNS3 2.1.15 software from either GNS3 official website or from github. It’s free. And then, we will download the GNS3 VM. It should be same version as GNS3 GUI software to work properly.
Download GNS3 2.1.15 software and GNS3 VM: https://github.com/GNS3/gns3-gui/releases/tag/v2.1.15

Now we will download VMWare Workstation 15.5 Pro. We have to go to the official website of Vmware. Go to download section and click Workstation pro. You either login or sign up to download this software.
Download VMWare: https://www.vmware.com/

After downloading VMWare, we will download Mikrotik CHR Image. We will go to mikrotik official site for downloading the image: www.mikrotik.com/download
In the download page, scroll down to Cloud Hosted Router section and download the raw disk image stable version.

Installing downloaded software:
It’s time to install everything. At first, GNS3. It’s very straight forward installation process. Tick all the boxes when prompted.

And then install VMWare. After installing VMWare workstation 15.5 Pro, open VMWare application and follow the below steps:
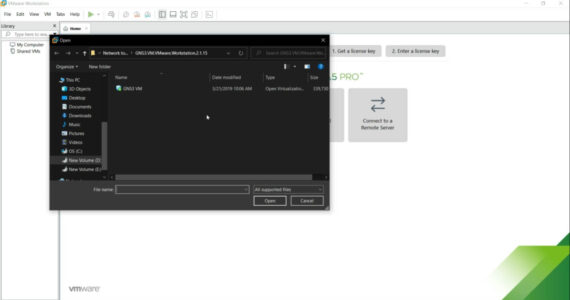
- Open a virtual machine

- Select GNS3 VM OVA file. Browse location for this virtual machine
- We will then change few settings here. Click on edit virtual machine settings.

- Set as per your PC configuration. I have set RAM-4GB, Processor 1, 4 core per processor, Network adapter: host-only, network adapter2: bridge.

Adding Mikrotik Router in GNS3
Now we will open GNS3 again. Follow the below steps:
- Edit > Preference

- Tick the box to enable GNS3 VM and run the VM in headless mode.

- Add Qemu VMs by clicking ‘New’ button

- The recommended way to run QEMU on Windows and OSX is to use it on GNS3 VM

- Give a name

- Keep the default memory size here

- Keep default console type: telnet

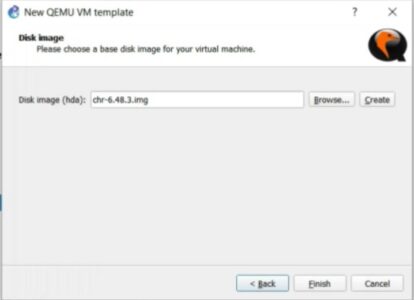
- Locate your Mikrotik CHR image (uncompressed)
- Now change few general settings for new QEMU VM: Select port to 5 port and change the router symbol.


If you complete up to this, your Mikrotik router is ready to use.
Open a new project and give a name. Now drag newly installed Mikrotik RouterOS. We will connect two routers to start our LAB.

Now start router. Right click on router and select console. That’s it.
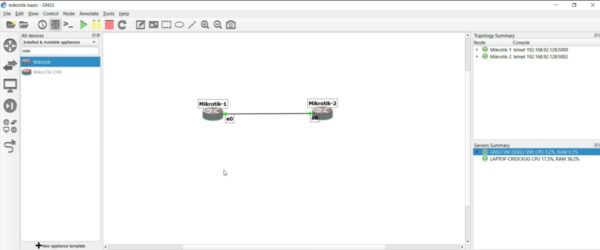
That’s how you can make your own Mikrotik LAB in GNS3.
Video Tutorial: